Followers of this blog my have noticed my involvement in a remote WFB3 game called "
The Bridge over the River Chai". As it so happens, one of the participants of this game might summon enormous hordes of Skeletons, by using
evil necromantic magic. To prepare myself for the such on occasion, I need to expand my current horde of 6 skeletons.
My understanding of an average skeleton is that they are an angry bunch of brain eating maniacs. I always thought John Blanche's vision of them to match this description quite accurately, as opposed to the bone polished, "G" rated versions of the late 90's. I like the macabre looking skeletons, covered in dirt and blood, seeking out vengeance to whoever comes in their path.
 |
| Arggh, we're bad to the bone! |
 |
| Look, we're shiny happy skeletons! |
See what I mean? It's all just a matter of taste of course, but to me this is how skeletons should look like. It's interesting to note that the picture above was taken from the WFB3 rule book, which is mirrored, so no, skeletons are not left handed.
Due to a limited time schedule I needed to paint quickly, and while at it, I thought to do a little quick paint tutorial, just for you...
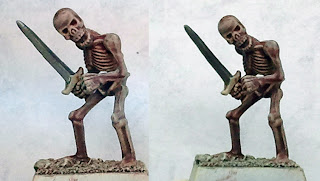
Luckily for me, I already had 12 cleaned (stripped of plastic mold lines) skeletons lying on my desk, ready to be glued and painted. Some months ago I spend hours removing every little mold line. I think it makes a lot of difference when they're cleaned properly.
I tried to mimic the poses as they are depicted on the Skeleton Horde box cover as much as possible.
Glued, based and coated they look like this.
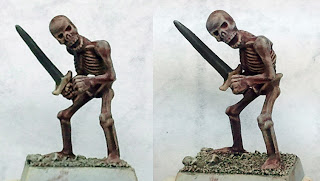
I won't bother describing the processes of basing and painting the weapons, but only concentrate on the skeleton's body. All the colors used are from the
Vallejo Game Color range, except "Bleached Bone", which is from GW. Below some pictures of each step involved.
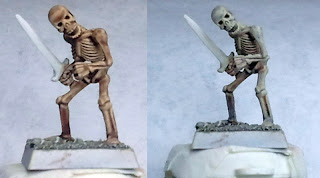
 |
| Step 1. Before and after "Sepia Shade" wash |
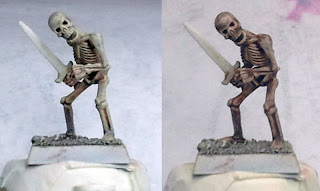
 |
| Step 2. Before and after "Bleached Bone" dry-brush |
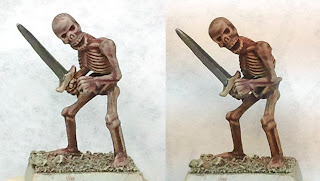
 |
| Step 3. Before and after "Umber Shade" wash |
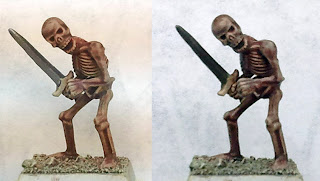
 |
| Step 4. Before and after "Skintone Shade" wash |
 |
| Step 5. Before and after thinned (1:2) "Red Shade" wash |
 |
| Step 6. Before and after "Bleached Bone" dry-brush |
 |
| Step 7. Before and after thinned (1:2) "Sepia Shade" wash |
 |
| Step 8. Before and after thinned (1:2) "Red Shade" wash |
 |
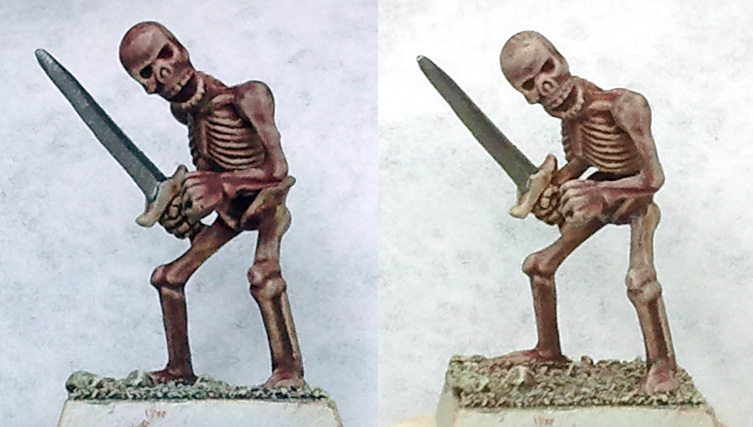
| Step 9. Before and after light "Bleached Bone"dry-brush |
 |
| Step 10. Before and after thinned (1:3) "Sepia Shade"wash |
 |
| Step 11. Before and after very light "Bleached Bone" dry-brush |
The washes are applied straight out of the bottle, no strings attached. I used Thinner (70.524) for step 5 & 7, 8, 10, 11 using a 1:2 ratio and only applied the wash on the crevices and the dry-brush of step 6, 9, 11 was done very lightly.
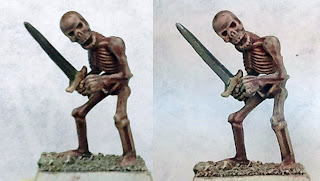
I varnished the lot with "Testors Dull Coat" and applied a "Gloss Varnish" on the bloody parts, to let the bloody parts look more fleshlike. Below the result.


Much better than the pearly whites!
ReplyDeleteInteresting - never thought of using the red and skin shade washes. Might have to try that when I finally get round to the rest of my Skeleton Army. the gloss varnish is a nice touch too.
Looking more like a horde now! ;)
Nice! They look like proper undead to me!
ReplyDeleteOooh, fantastic. These were the first models I ever painted.
ReplyDeleteI really like the look of your skeletons. I would probably stop at two washes though, but I think your final product was worth the extra effort.
ReplyDeleteThank you guys. That's the thing with washes, you can go on forever or stop somewhere in the middle. As for the tutorial, I might have stopped somewhere at step 7, you wouldn't notice the difference at a distance, but up close the extra steps are worth it.
ReplyDeleteHey Dreamfish, lovely skeletons. I found your blog through Thatsants' and there's some great stuff on here. In fact, I've nominated it for a Liebster award:
ReplyDeletehttp://geeklydigest.blogspot.co.uk/2012/11/liebster.html
Love all the great stuff you've been posting lately and these skeletons are no exception! I awarded you a Liebster Award, a chainletter award you may have seen going around the gaming blogosphere recently: http://belchedfromthedepths.blogspot.com/2012/12/five-winners.html
ReplyDeleteExcellent results. Consider this evil skeleton tutorial bookmarked. Cos it is.
ReplyDeleteHello, your blog is excellent !
ReplyDeleteI like it very well. Sorry for my bad english... I am french.
Yours skeletons miniatures are very good !
We have the same hobby. My blog : http://jeux-de-plateaux-et-roles.blogspot.fr/